
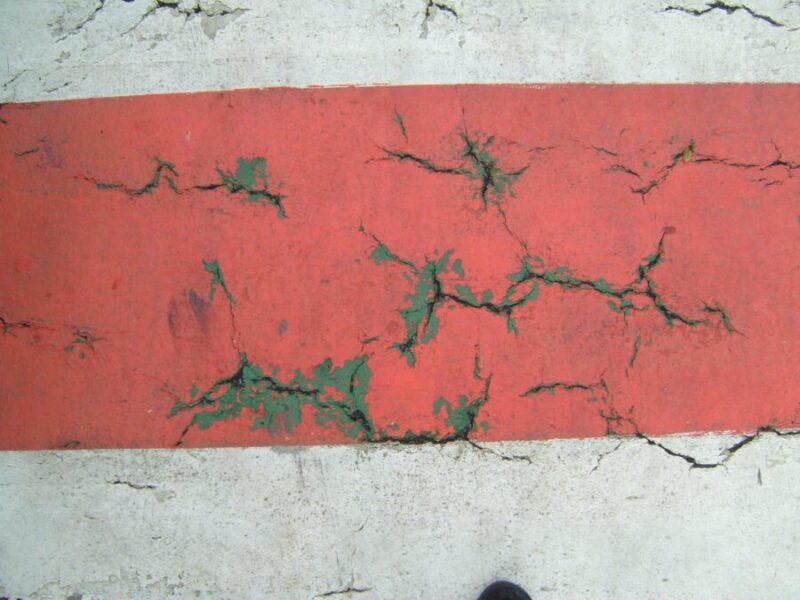
One of the most forgiving and versatile art mediums is oil painting. It allows you do-overs and lets you take your time without jeopardizing your artwork. However, if you don’t know how to do it right, you may fall prey to that dreaded enemy of oil painting: cracking.
Oil painting cracking can occur for a few different reasons, the main one being a failure to layer paints. If you’re guilty of this, you might be wondering, how long does it take for an oil painting to crack?
The answer varies depending on your painting technique. Here’s a look at the reasons why your oil painting may have cracked and how to prevent cracking in the future.
Table of Contents
How Long Does It Take for an Oil Painting to Crack?
The speed with which your oil painting will crack depends upon its layering and construction. It will take approximately one year for the painting to start cracking if it has normal layers of paint and 6-9 months if it has very thin layers of paint. If it has thicker layers, this might extend to several years.
But an oil painting is not meant to crack. If it does, that means you may have layered it improperly. Let’s have a closer look at why this phenomenon occurs.
Why Do Oil Paintings Crack?
The cause of oil paints cracking can usually be linked to inadequate practices and/or poor quality materials. Of these, the main reason why an oil painting may start cracking is that the “fat over lean” rule was not used while creating it. This is one of the main reasons why some people find oil painting hard. Luckily, with practice anything can be learned .
.
Painting fat over lean means you should put a thin layer of paint on the canvas first before placing a thicker second layer of paint. The next layer of paint should be applied only after the previous layer is sufficiently dry and won’t dissolve. If you don’t follow this fat over lean principle, your artwork will be more likely to crack.
Of course, it’s not always possible to guess how many underlying layers of paint on the canvas will allow you to get the outcome you want. With this in mind, you must seek to ensure that no paint layer is too fat; otherwise, any later layer of paint won’t be able to bond with the underlying layer.
In general, keep in mind that using an excessive amount of oil with your pigment will cause the paint film to get wrinkly under a paint layer during the painting’s ageing process.
Additionally, if the pigments or mediums (e.g., linseed oil) that you layer are of low quality, they will cause a weaker paint layer and cause your entire painting to deteriorate more easily over time.
How to Create Oil Paint Layers?
Painting fat over lean is of utmost importance. And the two main oil types used for the technical integrity of oil painting are drying and volatile.
As the name suggests, drying oils (such as natural oils like walnut oil, linseed oil, and safflower oil) help your painting dry quicker, which means they oxidize and harden over time. By contrast, volatile oils, such as turpentine, evaporate.
“Fat” layers of paint are those that contain more drying oils, while “lean” layers are those with a lower amount of drying oil. These fat paint layers should go over the thinner lower layers in order to prevent cracking, especially if your artwork has several layers.
Now, your support (such as a canvas) will contract and expand in response to the weather. Fat layers of paint do this more easily than lean ones.
So, if you get the amount of turpentine (or other oil medium) wrong while layering your paintings, your oil painting will crack.
That’s why it’s important to add a suitable medium to the mix and ensure that the top layers of your oil painting have the flexibility and that the ageing process does not spell trouble. Be careful also not to use too much oil if you don’t want the pigment to disperse.
If you’re new to oil painting, you might initially find it difficult to get the fat over lean technique right. But a little patience goes a long way.
Do’s and Don’ts of Oil Painting
Always Prime Your Canvas
The painting surface, or canvas, on which you will paint must always be primed properly. And the durability of your artwork will be largely determined by how well you’ve carried out the preparation.
Whether you’re using linen, cotton, paper, or cardboard, you must ensure that it is properly treated first. Gesso is the top choice of most artists, and it’s recommended to create two layers of gesso as a primer.
A canvas that has not been treated sufficiently will absorb the oil from your painting and, in turn, be damaged itself. As such, your paint layers should have a sufficient amount of oil to create a strong film and allow your oil colours to bond properly.
Avoid Substitute Products
This means sticking to products that are created specifically and only for oil painting. For example, you might be tempted to use a household emulsion in place of a proper primer in order to save money. Don’t do this, as it will cause the support to—once again—absorb the oil.
The same goes for solvents and mediums intended for industrial or household use; don’t use them with your oil paints. Not only can such solvents interfere with the durability of your artwork, but they can also damage your paintbrushes.
Don’t Combine Different Mediums
Mediums that have different drying rates should never be mixed, as this can definitely cause cracking. Furthermore, you must always make sure to carefully read the medium manufacturers’ instructions to understand how to use the medium.
Even if you think you know how, you might be surprised. Rabbit skin glue, for example, has to be used in a different way than linseed oil, a popular oil medium.
Furthermore, in one painting, use only one medium.
Glazing Might Help
Glazing is the name of a transparent layer of paint that gives your painting a shiny or “glazed” look. Your painting will remain the same, but the colors will change and take on a more refined look with the glazing layers. This can be helpful if you want your painting to look a little different or are actually going for the shiny look.
A layer of glazing may also prevent your artwork from cracking. However, for this to work, the glazing layer must be more flexible than the paint film under it. Once again, the fat over lean rule is used. If you’re looking to glaze your painting, don’t skip the research—find a suitable medium, of which you will find many.
Don’t Be So Quick to Varnish
Varnish is a crucial step for those wishing to ensure that their artwork retains its appearance. Varnish not only creates a protective layer that keeps out dust and dirt but also helps to even out the painting’s appearance by making it matte or glossy. For many artists, applying varnish is a crucial final step.
A very common rookie mistake, however, is to varnish an oil painting before it has properly dried through. Let the paint dry completely before you apply the first layer of varnish.
If the oil paint is not completely dry before you apply the varnish, it might stick to the varnish layer and be displaced by the varnish surface when it dries and subsequently contracts. So, make sure your artwork has completely dried before applying varnish.
Store and Dry Your Artwork Properly
Light and oxygen combine to start the chemical process, which dries an artwork created with oil paint. This requires a lot of light and ventilation in order to start the oxidation process, which is why drying takes a long time.
If you want your paint to dry faster, it’s recommended to provide lots of natural light and ventilation. However, you must be careful not to place the finished artwork in direct sunlight, as this can damage the artwork’s surface.
Furthermore, you must avoid spots with high humidity, too, if you want a shorter drying process. Paint dries quicker in the air that is not so moist.
Final Words
While many rookie artists wonder how long does it take for an oil painting to crack, what they might not know is that it’s not supposed to happen at all! We hope we’ve helped you to uncover the answer to your oil paint cracking questions. Good luck!