
Traditional fabric paints, while effective, can be expensive and offer a limited range of colors, making it difficult to fully express your creativity without overspending.
This limitation can feel frustrating, especially when you’re eager to experiment and bring your unique designs to life. The cost and restricted palette can stifle your artistic freedom, leading to a compromise in both vision and execution.
But what if you could transform what you already have? With our article How to Turn Acrylic Paint into Fabric Paint with Fabric Softener we also experiment using other simple household items such as hair conditioner and glycerine. These sustainable alternatives not only save money but also unlock endless possibilities for your fabric art projects.
Table of Contents
- 1 What You Need to Know to Turn Acrylic Paint into Fabric Paint
- 1.1 Section 1: Choose the Right Fabric to Paint With Acrylic Paint On
- 1.2 Section 2: You Need to Prepare the Fabric Before you Paint on It
- 1.3 Section 3: Materials Needed to Turn Acrylic Paint into Fabric Paint
- 1.4 Section 4: Making Your DIY Fabric Paint
- 1.5 Section 5: Application Process
- 1.6 Section 6: Caring for Your Painted Garment
- 2 Final Words
- 3 Sources
What You Need to Know to Turn Acrylic Paint into Fabric Paint
While we could just give you the proportions of different products to mix with acrylic paint to get fabric paint, there are many other factors that you should take into consideration if you want to have a good end-result when painting on fabric —especially if you are using everyday products that could compromise the quality of your piece.
Among the things to consider when working with the fabric, you also need to know how to prep the fabric and types of fabric that are better to use, what other materials you need and also how to take care of your garment. We will list all the things you need to know in the order that we found more intuitive when it comes to the actual process.
Section 1: Choose the Right Fabric to Paint With Acrylic Paint On
When it comes to fabric painting, selecting the right type of fabric is crucial for achieving the best results. Not all fabrics are created equal, and your choice can significantly impact the durability, vibrancy, and overall finish of your artwork.
Importance of Fabric Texture
The texture of the fabric plays a vital role in how the paint adheres and how the final piece looks. Tightly woven fabrics like cotton and silk not only offer vibrant colors but also enhance the durability of the paint. These fabrics allow the paint to bond effectively with the fibers, ensuring that your design remains intact even after repeated use and washing. The smoother the fabric, the easier it is to apply paint evenly, leading to a more professional and polished outcome.
Suitable Fabrics
For the best results, opt for natural, tightly woven fabrics such as cotton, linen, denim, canvas duck , and silk. These materials are excellent at absorbing paint, allowing for vibrant and long-lasting colors. Cotton and linen, in particular, provide a smooth surface that helps in achieving sharp, clear designs, while denim and canvas duck offer a more textured finish that can add character to your project. Silk ensures that your paint adheres well, resulting in a rich and durable finish.
Fabrics to Avoid
While it might be tempting to experiment with various fabrics, it’s best to avoid stretchy, slick, or coated materials. Stretchy fabrics, like spandex or lycra, can cause the paint to crack or peel when the fabric is stretched. Slick or coated materials, such as polyester blends or fabrics with water-resistant coatings, do not absorb paint well, leading to frustration as the paint may slide off or fail to adhere properly.
Section 2: You Need to Prepare the Fabric Before you Paint on It
Before diving into your fabric painting project, proper preparation of the fabric is essential to ensure your artwork looks its best and stands the test of time. Skipping these steps can lead to uneven paint application, reduced durability, and a less polished final result.
Cleaning and Prepping the Fabric
Start with clean fabric. It’s crucial to remove any dirt, oils, or residues that could interfere with the paint adhering properly. When washing your fabric, avoid using fabric softener, as it can leave a coating that repels paint and prevents it from bonding well with the fibers. This simple step will help ensure that your design lasts longer and maintains its vibrancy.
Ironing the Fabric for a Smooth Surface
After washing, the next step is to iron the fabric. A smooth, wrinkle-free surface is essential for achieving clean lines and even paint distribution. Wrinkles and creases can cause the paint to pool or skip over areas, leading to an uneven appearance. By ironing the fabric thoroughly, you create a flat, consistent surface that makes painting easier and helps your design look more professional.
Put a Protective Material Below Your Fabric
Make sure that whatever fabric you are painting on has protective material below, to ensure not only the cleanliness of your working space, but the protection of the rest of the garment, if you were to paint a t-shirt, dress or any other clothing item.
Section 3: Materials Needed to Turn Acrylic Paint into Fabric Paint
In this guide, we’ll show you how to transform regular acrylic paint into fabric paint using common household items. While there are ready-made products available—such as Liquitex Professional Effects Medium, or Magicfly Permanent Soft Fabric Paint Set—to mix with acrylic paint, this DIY approach is both budget-friendly and effective.
Gathering Your Supplies
- Acrylic Paint: Acrylic paint is the base of this DIY method. It provides strong, vibrant colors, but needs to be mixed with other materials to make it suitable for fabric.
DIY Mediums
- Fabric Softener: Fabric softener helps to soften the acrylic paint, making it less stiff once it dries. A good ratio to start with is 1 part paint to 2 parts fabric softener. This mixture ensures that your paint will dry soft and flexible on the fabric, instead of hard and crunchy.
- Glycerine and Hair Conditioner: Glycerine can act as a binder, helping the paint stick to the fabric while maintaining flexibility. Hair conditioner can also be used in small quantities to soften the paint. These ingredients are useful for creating a smoother finish on your painted fabric.
- Water: Water is used to thin out the paint and make it easier to apply. Be careful not to add too much, as it can dilute the color or affect the consistency.
Additional Tools
- Brushes: For detailed painting, a variety of brush sizes will help you achieve different effects. You can also apply painting with a sponge, depending on the outcome you desire.
- Mixing Containers: Disposable cups or bowls are perfect for mixing your paint, fabric softener, and other ingredients.
- Spray Bottle: A mixture of water and fabric softener in a spray bottle can be used to lightly mist the fabric before painting. This ensures the first layer of paint adheres smoothly.
- Sandpaper: If painting on textured fabrics or furniture, sandpaper can be used between layers of paint to create a smoother surface.
- Protective Materials: Place cardboard or plastic inside garments to prevent paint from bleeding through to the other side.
Section 4: Making Your DIY Fabric Paint
In this section, we’ll explore various methods to create your own fabric paint using different household ingredients. Each method has its own unique qualities, so feel free to choose the one that best suits your project.
Using Fabric Softener
Fabric softener is a popular and easy way to create flexible fabric paint.
- Ratio and Mixture: Start with a mix of 1 part acrylic paint to 2 parts fabric softener. This ratio provides a softer, more flexible finish compared to pure acrylic paint.
- Result: The fabric softener ensures the paint feels soft on the fabric. However, adding too much can cause slight color alterations and result in a sticky finish if overused.
- Application Tips:
- Spray your fabric very lightly with a mixture of water and fabric softener (⅓ fabric softener to ⅔ water) before applying the first layer of paint. This helps the paint adhere better to the fabric.
- If you use too much water your paint will bleed further than what you expect – try to make a mist rather than a direct water spray.
- It’s better to put less fabric conditioner than you think —it’s easier to add some than to make up by adding more acrylic paint.
- For smoother results, apply the paint in thin layers, sanding between coats if necessary.
Using Glycerine
This method involves making your own fabric medium with glycerine for a durable and flexible finish.
- Ratio and Mixture: 1 part glycerine to 5 parts acrylic paint. Combine to create a smooth, fabric-ready mixture.
- Result: This method provides flexibility, durability, and helps prevent mold growth in your paint mixture.
- Application Tips:
- Mix your paint colors before adding the homemade fabric medium to ensure consistent color.
- A lot of other webpages recommend using vinegar or mention it as optional. I would not use vinegar: even when testing with a couple of drops, it broke my paint’s binder. It’s possible my acrylic paint is of poor quality, but I still achieved a good result using only glycerin.
- After your design is complete and the paint has dried, iron it on the reverse side, or run it through the dryer for 20-30 minutes.
Using Hair Conditioner
Hair conditioner can be used in small quantities for delicate designs or small projects.
- Ratio and Mixture: Mix 1 tablespoon of warm water with 1 drop of hair conditioner. Stir until dissolved, then add 1 tablespoon of acrylic paint.
- Result: Ideal for detailed or small-scale projects due to its softer consistency.
- Application Tips:
- Take your time and apply the paint slowly, letting each layer dry for at least 24 hours before adding another.
- Unlike the mixture done with fabric softener and glycerine, using hair conditioner and the amount of water suggested makes it much more prone to bleeding.
- Always protect layers of fabric using cardboard or plastic between them to prevent bleed-through.
Using Water for a Watercolor Effect
For a lighter, abstract design, you can thin acrylic paint with water.
- Ratio: Use 1 part acrylic paint to 1-2 parts water to achieve a flowing, watercolor effect.
- Best for: This method works best on light-colored fabrics, especially when creating dreamy or abstract patterns.
- Application Tips:
- Experiment with the water-to-paint ratio for different effects. More water will result in a softer, more diluted color, while less water will retain more vibrancy.
- Allow the paint to flow naturally across the fabric for organic, unexpected designs.
Section 5: Application Process
Creating a successful DIY fabric paint project requires careful application. Whether you are doing a small detailed project or painting a big surface, here’s a step-by-step guide to help you achieve professional-looking results.
Step 1. Sketch Your Design
Before you begin painting, outline your design on the fabric using a pencil or chalk. This helps guide your painting process and ensures accuracy. For light fabrics, pencil works best, while chalk is ideal for darker fabrics. Sketching first prevents mistakes and allows you to adjust your design before committing paint to fabric.
Step 2. Mix the Paint
Prepare your fabric paint by combining acrylic paint with your chosen fabric medium (such as fabric softener, glycerine, or hair conditioner) in a mixing container. The ratios vary depending on the method you’re using. As a reminder:

To see how hair conditioner can be used as a medium I watched The Art Club Online: Painting on Clothing with ACRYLIC PAINT! (No Fabric Medium Needed!). I think it’s an interesting result:
Step 3. Apply the Paint
Once your fabric is prepped and your DIY fabric paint is mixed, it’s time to apply the paint. Depending on your project, different techniques will yield different results. Whether you’re painting bold, solid blocks of color or using a sponge for texture, following these guidelines will help you achieve a professional finish.
- Brush Application for Solid Color Blocks
- Use a flat, medium-sized brush: This helps distribute paint evenly and ensures smooth edges.
- Thin, even layers: Apply the paint in light, thin coats to avoid stiffness. Allow each layer to fully dry before adding the next one—this prevents cracking and ensures a smoother finish.
- Avoid overloading your brush: Too much paint can cause lumps or uneven textures. Dip your brush lightly into the paint and apply it in long, smooth strokes. Clean your brush once in a while to avoid build-up.
- Sponge Application for Texture
- Dab, don’t drag: Gently dab the sponge onto the fabric for an even, textured effect. Dragging the sponge may cause the paint to smudge or become uneven.
- Build layers: Start with a light application, then gradually build up the texture by layering more paint as needed. This gives your design more dimension while avoiding over-saturation.
- Best for larger areas: Sponges are ideal for covering large areas quickly, while still giving the fabric a soft, textured look.
- Watercolor Effect
- Thin the paint with water: This method works well for light fabrics and creates a dreamy, watercolor-like design.
- Let the paint flow: Allow the thinned paint to naturally spread across the fabric, creating organic patterns and gradients. You can tilt the fabric to control the flow and direction.
- Layering for Intense Colors
- Multiple layers are key: Apply the first coat and let it dry fully before adding subsequent layers. This will help intensify the color without overloading the fabric with paint.
- Heat setting between layers: After each layer has dried, gently heat set the fabric (either by ironing or placing it in a dryer) to help the paint bond to the fabric.
Step 4. Let Each Layer Dry Completely
Allow the paint to dry completely before applying another layer. Drying times may vary depending on the environment, but a minimum of 24 hours is recommended. Rushing the drying process can result in cracking or uneven paint coverage.
Section 6: Caring for Your Painted Garment
Once your design is complete, taking the proper steps to care for your painted garment ensures that your artwork stays vibrant and lasts through wear and washing. Follow these aftercare instructions to maintain your custom-painted piece.
Drying
Allow the paint to dry completely before exposing your garment to any kind of washing or heat. It’s crucial to let it dry for at least 24 hours after completing your design to ensure the paint has fully cured. Drying too soon can lead to smudging or fading of the paint.
Washing
When it’s time to wash your garment, hand washing is the safest method to preserve your design. If you prefer using a washing machine, select the gentle cycle with cold water. Turn the garment inside out to protect the painted surface from friction and avoid using fabric softener, as it can weaken the bond between the paint and fabric.
Heat Setting
To make sure the paint is firmly adhered to the fabric and less prone to peeling or fading, heat set the design. This can be done by ironing the garment on the reverse side using a low to medium heat setting. If you prefer, you can run it through a dryer on low heat for about 20-30 minutes. Either method helps lock the paint into the fabric fibers for better durability.
Maintenance
For long-lasting results, wash your painted garment sparingly. Spot clean small stains whenever possible to avoid frequent laundering, which can wear down the paint over time. Following these steps will help maintain the vibrancy and texture of your design, keeping it looking fresh for longer.
Final Words
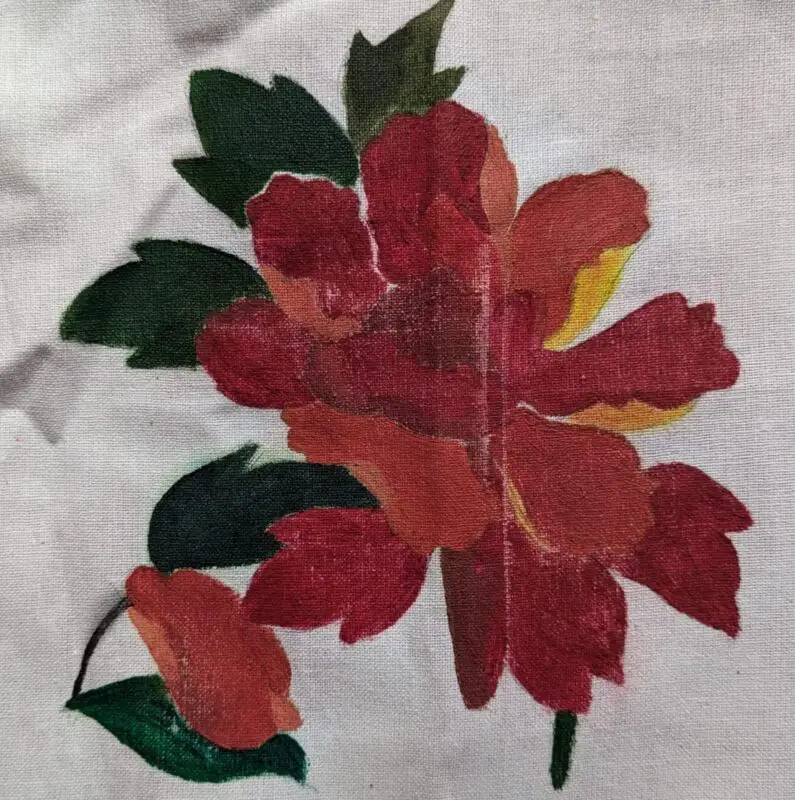
Experimenting with different methods to turn acrylic paint into fabric paint has been both insightful and rewarding. I tested various mixtures—fabric softener, glycerine, hair conditioner, and a pre-made fabric paint from the Magicfly set—on a small design, applying only one layer to understand the properties of each. Do note that I was not aiming at finishing any of these designs or making them all the same colors, as for one thing they are all going to be part of much bigger mix media projects, and second I was just getting the hang of the materials.
On The Medium
Fabric softener was a decent option, producing a soft finish, though it required careful handling to avoid oversaturating the fabric. Bleeding occurred when I used too much water, so it’s something to be cautious about, particularly when working on small, detailed designs. I sanded it a little to make a second layer but it blemished the white fabric I was working on so I couldn’t continue.
Glycerine emerged as my favorite. It created a smooth, durable finish with excellent coverage, and it didn’t need any additional ingredients like vinegar, which I found could break the paint’s binder. This method provided the best overall balance of flexibility and quality, making it ideal for various fabric art projects.

Hair conditioner came close behind, offering good coverage but with more noticeable bleeding due to the addition of lukewarm water. It’s a great option for softer, more fluid designs where precision isn’t as critical.
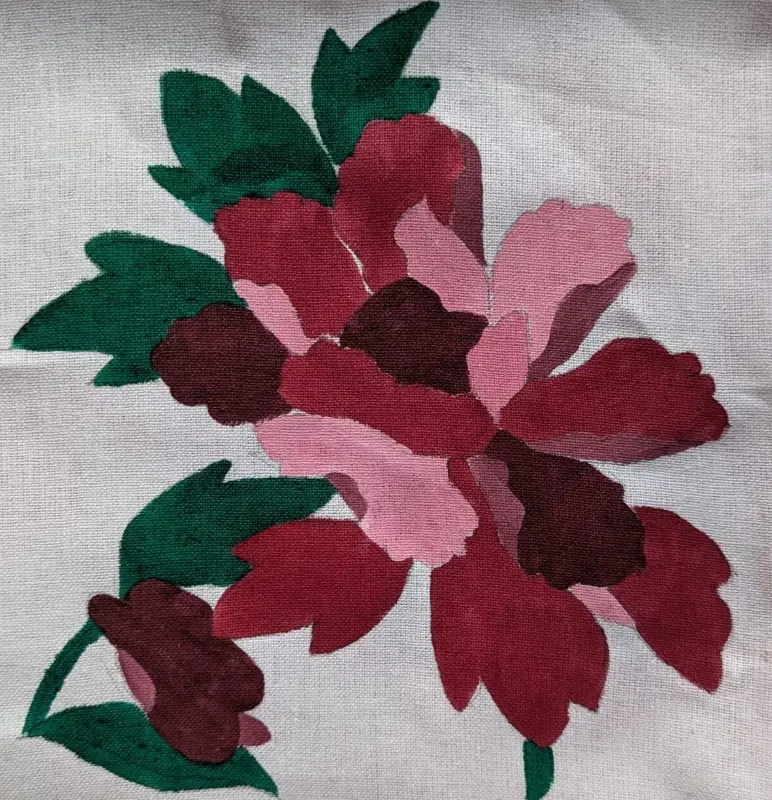
While the Magicfly Fabric Paint set did the job, I found the color palette somewhat limiting compared to the control I had when mixing my own mediums. Overall, creating my own fabric paint allowed for more creativity and adaptability in my designs.
Sanding
When it comes to sanding between layers, this technique is more suited for larger surfaces rather than small, detailed designs. Sanding helps create a smoother finish by evening out the layers of paint, but it’s less practical for intricate work where precision is key. On larger projects, sanding can enhance the overall texture and ensure a more professional result, while for smaller, detailed designs, it’s often unnecessary and could risk disrupting fine lines or delicate patterns.
How the Acrylic Behaves When Mixed with a New Medium
Finally, one important thing I noticed while making these mixtures is that the drying process of acrylic paint is slightly delayed when mixed with other mediums. Although you can take some time between layers (one or two days in my case), it is not recommended to leave your mixture uncovered, as this helps protect it from dust and other particles that might fall in.
Detailed design versus big surfaces
When working on smaller, detailed designs, mixing the materials can be more challenging compared to larger projects. The proportions given in this article are easier to manage for bigger surfaces, where minor variations in the mixture are less noticeable. However, for small-scale work, it’s essential to follow the proportions exactly as described. In my experience, even small deviations can affect the consistency, leading to issues like bleeding or uneven coverage. Additionally, be mindful of not over-mixing—prepare only the amount of paint you need to avoid wasting materials, especially acrylic paint, which can quickly add up if you make too much.
Although my original aim was to research How to Turn Acrylic Paint into Fabric Paint with Fabric Softener, through this process I’ve discovered that the best method really depends on the type of project you’re working on, and each medium has its strengths and limitations. For anyone looking to explore fabric painting without breaking the bank, I highly recommend experimenting with these simple DIY mixtures to see what works best for your needs.
Sources
- Emma Nies: DIY PAINTED FAUX LEATHER CHAIR // from Goodwill to Pottery Barn
- Little Red Window: It’s Easy! How To Turn Acrylic Paint Into Fabric Paint
- Our Upcycled Life: How To Paint Fabric Furniture The Easy Way
- Quora: How do you turn acrylic paint into fabric paint?
- Sew Guide: You want to use Acrylic Paints on Fabric? Here’s How!
- Smor Home: How To Make Your Own DIY Fabric Paint
- The Art Club Online: Painting on Clothing with ACRYLIC PAINT! (No Fabric Medium Needed!)
- The Creative Folk: How To Turn Acrylic Paint Into Fabric Paint Without Medium
- The Graphics Fairy: How to Turn Acrylic Paint into Fabric Paint!