
Woodcut painting is perhaps one of the oldest forms of painting. For centuries, knives have been used to carve on the wood, revealing a design on the raised surface of the wooden block; these raised surfaces are then dabbed in ink and then used for painting. There are certain key essentials that one must know as a beginner in woodcut or woodblock painting.
The essentials for woodcut painting for beginners start with understanding the history of woodcut painting and the various tools and techniques used to create this kind of wood relief. It can be made using wood, such as hardwood, softwood, and even plywood.
This guide aims to help you understand the evolution of this ancient technique and its modern-day use. It will also shed light on the technique used to make this art. Keep reading to learn The Essential Woodcut Painting Intro for Beginners:
Table of Contents
- 1 What Is Woodcut Painting?
- 2 The History of Woodcut Painting
- 3 Kinds of Wood Used in Woodcut Painting
- 4 Tools and Supplies You Will Need for Your Woodcut Painting
- 5 The Use of Color in Woodcut Paintings
- 6 How to Do Woodcut Paintings – Overview of the Process
- 6.1 Beginner’s Guide to Choosing the Painting Image
- 6.2 Draw Lightly on the Wooden Block
- 6.3 Finish Carving the Complete Motif
- 6.4 Align the Painting Surface to the Wooden Block
- 6.5 Apply the Ink With the Help of a Brayer
- 6.6 Place the Wooden Block on the Painting Surface
- 6.7 Check for Any Further Carving Required on the Basis of Your Proof
- 7 Final Words
- 8 Sources
What Is Woodcut Painting?
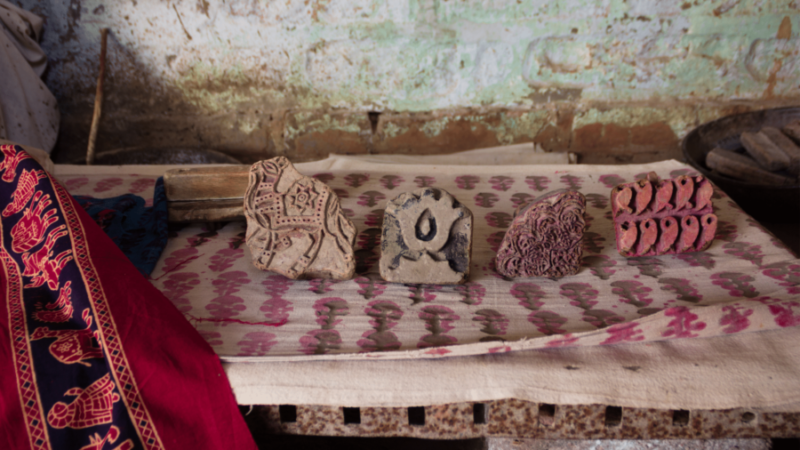
Woodcut painting uses various kinds of chiseling tools such as knives, gouges, and chisels to carve out a raised portion from a wooden block. The carving needs to be done so masterfully that the ink does not reach the recesses between the carvings when the wooden block is dipped in ink.
When the wooden block is lowered into the ink, only the raised portion gets stained with the color. It is then transferred into the painting material, and the inked wooden block works more like a modern-day stamp as it paints the surface. Woodcut printing can be done by hand as well as by using a woodcut printing press.
The History of Woodcut Painting
This art form is also known as xylography and refers to a painting technique that uses reliefs made on wooden blocks to paint images on a surface. Woodcut painting can be dated as far back as 800 CE. The first records of woodcut painting are found in China, where it was referred to as banhua.
The woodcuts in China were not merely depictions of scenery and pictures but also contained texts. They would be used to reproduce Buddhist texts, and in some cases, were also used as banknotes. China is also believed to be the first place that made colored woodcut paintings.
In certain parts of Europe, woodcuts from the early 1400s have been found. Most of them feature religious subjects that were perhaps printed to aid in the worship of the deity.
Books, too, began to be illustrated using this woodcut technique. In the 1500s, Albrecht Dürer, a German artist from Nuremberg, established his reputation due to his high-quality woodcut prints and elevated them to the echelons of fine art.
Woodcut painting fell out of fashion by the turn of the century when artists and collectors began to place more value in printings fashioned by other techniques such as etching and metal plate printmaking. Nonetheless, woodcuts continued to be made, but its patrons had dwindled. So the art form was used for more everyday and ordinary things like book covers and advertisements.
This art form gained popularity in Japan, and they preferred to use cherry wood for this work. In Europe, beechwood became a more popular choice. However, in both places, the design of the woodcut was solely entrusted to the artist.
A craftsman was employed who would then carve out the wood as per the design. Sometimes, the artists themselves would engage in the process of carving as well. This artistry flourished in Japan under the name of Ukiyo-e that depicted scenes of history and folklore and travels and portraits of men and women using woodcut painting.
France stood witness to the recent revival of the woodcut painting. In the 1850s, France produced some highly talented artists such as Paul Gauguin, Edvard Munch, and others who brought woodcut paintings once again to the forefront in the world of art.
Woodcut Paintings Are Used in Lieu of Seals and Stamps
Even to this day, woodcut paintings are often used instead of seals and sometimes in stamps. Before woodcut paintings, old civilizations have used seals and stamps to make impressions on clay tablets and other surfaces.
Some of the oldest seals come from Mesopotamia and Egypt, where the reusable characters were stamped repeatedly. In India, the printing of cloth preceded the printing on other materials such as paper. In China, small stamps were first used before printing by using large wooden blocks.
Books Were Printed Using the Woodcut Printing Method
In China, many Buddhist texts were being printed using this method of woodcut printing and can be dated as far back as the Tang dynasty. Another Buddhist canon, Tripitaka, which is over 100,000 pages long, is believed to have been entirely printed with wooden blocks in the 10th century.
The text of the Korean Dharani Sutra, a scripture of the Mahayana Buddhism, can be found to have been printed on a mulberry paper scroll and traced back to the ancient Korean kingdom of Silla. Japan, too, has copies of the Dharani Sutra printed similarly and stored in the wooden pagodas.
An archaeologist, Sir Marc Aurel Stein, found a Chinese scroll that dates back to 868 AD. This scroll is an early form of a book, and it contains instructions on woodcut painting. These scrolls were sewn together or pasted to give it the semblance of what a modern-day book looks like.
Woodblock Prints Were Commonly Used in Japan
In Japan, Empress Shotoku commissioned the printing of wooden pagodas with short scrolls. This is considered to be the earliest known woodblock printing in Japan. The scrolls were distributed to temples all over Japan, and woodcut printing remained mostly restricted to the printing of religious texts. Later a Chinese-Japanese dictionary also emerged around the late 1500s.
Gradually, as the movable printing press came into existence and became popular, wooden type-pieces were increasingly used to print political and historical texts in addition to religious texts. Even though the movable printing press became popular, it was decided that given the running script style of the Japanese, their writing would be better if reproduced using woodcut prints instead.
That is how woodcut printing was adopted once again, and by 1640 this age-old method was once more used for all printing purposes. Publishers also used this method to publish books, and sometimes even the calligraphic skills of a person were used as the standard style for creating the printing templates.
Woodcut Painting Gained Popularity Across the World
The technique of woodcut printing spread through Asia and made its way into the world of the Byzantine Empire around AD 1000. Traces of this can be seen in the cloth designs from that time. The technique came to be known in Europe by 1300, where it was adopted for printing on paper and went on to become a popular practice to print popular religious work using this method.
The Invention of Block Books
Block books became increasingly famous in Europe in the 15th century. Religious texts and images began to be made out of a single block of wood by the mid-15th century. These books were mostly undated, so it became quite difficult to estimate the date when they were printed.
However, by comparing the watermarks in the paper, it can be roughly estimated that the books were printed in the second half of the 15th century.
Block books were an alternative to the more expensive books mass-produced by the printing press, and they continued to be printed till the end of the 15th century. Some of the most famous block books include Speculum Humanae Salvationis and the Ars moriendi. The Biblia pauperum also became very famous for being a Biblical picture book.
Most of these block books were popular devotional works that carried many imageries and were quite less in several pages, mostly less than fifty pages. Movable metal type printing was gradually taking precedence, and woodblock printing slowly gave way to this modern European technology.
Another interesting thing about block books is that they were mostly printed on just one side of the paper, as printing on both sides would damage the first printed on.
For scholars who researched the printing techniques from that past era, it became easier for them to determine by looking at both sides of the paper which one was printed using a printing press and which was printed using the woodcut system.
Kinds of Wood Used in Woodcut Painting
The type of wood that is used will vary depending on the experience you have with woodcut painting. As a novice, it is recommended that you start with something more pliable and softer so that you can create the kind of finish that you want in your final print with relative ease.
This will help you get acquainted with the woodcut process before you take on some of the sturdier kinds of wood that experienced professionals use.
Softwood
You could use a variety of softwood or hardwood for your woodcut painting projects. Softwood mostly includes pine, spruce, cedar, and fir, which are relatively more pliant and easier to work with, and less expensive.
Hardwood
Hardwood, such as maple and cherry, is comparatively more difficult to carve and is also more expensive than softwood. You will also need to sharpen your tools more frequently if you are working with hardwood. One advantage of hardwood is that due to its toughness, finer details can be carved into them.
Plywood
Plywood is the easiest to work with and lighter on the pocket than hardwood or softwood. Plywood panels are made up of layers of thin wood that are glued together and are available in a range of thicknesses.
It is believed that the thicker the plywood, the flatter it will tend to be, which is great for woodcut painting. But, as the plywood gets thicker, its price also increases. You can source your plywood from printmaking suppliers who specialize in providing wood with the right softness for quality woodcut paintings.
Tools and Supplies You Will Need for Your Woodcut Painting
You will need a few tools and supplies for your woodcut painting. These tools are mostly to carve out the raised portions which will be used for painting. You will also need ink to dip the woodcut into, and finally, you will need the surface material on which you will transfer the print. Here is a look at the key tools that you will need for woodcut painting.

Knives and Gouges
Firstly, you will need knives and gouges to help carve the wood from the block. These gouges and knives need to be of varying sizes to help carve out large chunks and create the finer details in the motif. There is a particular gouge called the V-gouge that is used to carve against the grain. The U-gauge is recommended for carving with the grain.
When you use the blades, it is crucial to remember not to force the blades but keep them at a slight angle instead. This will help prevent the wood from breaking.
The BeaverCraft S17 Spoon Carving Tools Wood Carving Tools Set has a hook knife, a chip carving knife and a sloyd knife that allow to implement different techniques of carving, and it comes with a canvas designed to keep all your tools together. Please notice you must be over 18 years old to buy this product.
Having a sharpener in your toolbox is essential when woodworking for obvious reasons. Many even recommend the X-Acto knives to beginners in this art form. It comes in handy when carving out finer details at the initial learning stages.
You will then need a brayer to roll the ink into your woodblock. The Speedball Deluxe Soft Rubber Brayer can be found in various sizes from 1.5 inches (3.8 cm) to 6 inches (15.2 cm) and can be used for any relief painting purposes.
Brayers are useful in applying the ink evenly on the relief, thereby ensuring that the paint is uniformly distributed on the printing surface. Avoid overloading the brayer with ink as that may end up in splotches and a murky painting.
Printing Ink
Next, you will need the printing ink. These inks are specially manufactured for woodcut painting, but for beginners, it is recommended to use water-soluble ink instead as it helps in a quick clean-up should a mess happen.
For printing on fabrics, special inks are made solely for textiles and are great to use because of the paint’s consistency, thereby making the final work product an exquisite work of art.
Baren
Lastly, you can also consider the baren as an optional tool in your arsenal. This is used to place pressure on the wooden block when transferring the print from the block to a surface. Most people use their hands and lean in with their body weight to put pressure on the wooden blocks. Others recommend using the baren to uniformly distribute the pressure giving a more finished look to the final product.
The Use of Color in Woodcut Paintings
In the early 1900s, parts of the United States and Europe embraced the idea of adding color to woodcut paintings. William Morris, a British textile designer, and social activist was a major influence behind this renaissance in woodcut artistry. He urged people to use traditional craft techniques and oppose mass-produced items that infringed on the dignity of human labor.
Artists began making color woodcuts with prints that involved hand carving. More and more woodcut paintings celebrated the uneven ink colors and coarsely cut lines in the wood reliefs, which carried signature styles that the maker’s hand alone possessed. Natural materials such as wood, paper, and ink were once again brought to the forefront.
All that was lost in the vast recesses of mass production were once more brought to life.
Japanese prints and printmaking characteristics inspired a large part of these paintings. The Japanese art form inspired many artists across the work, and its impact can be seen in many woodcut paintings worldwide.
Yet, with time, each country had its own way of interpreting this art form. The Austrians adopted colored woodcuts as a rustic art form. At the same time, the British perfected the creative processes, and the Germans focused on their cultural identity that got depicted in the woodcut paintings.
How to Do Woodcut Paintings – Overview of the Process
An authentic woodcut painting process involves carving wood with the help of a knife or chisel that would gouge out chunks of wood from a block and leave behind a raised surface that is the actual design with which the woodcut painting is to be done. The part that is chiseled away does not get printed.
In the 1900s, many U.S. and European artists studied the woodcut painting techniques employed by the Japanese as their art form gained popularity all over the world. They would carve separate wood blocks for each color in the image, and the printing surface had to align perfectly to each of these colored blocks for the final print to appear precise and cohesive.
Beginner’s Guide to Choosing the Painting Image
After you have all your tools in place and the woodblock is ready for carving, the next step is to choose an image or motif that you will replicate on your wood carving. Sometimes I like to think about the romanticism of materials and the perdurance in time. However, it will be simpler to choose something less complicated and easy to carve as a beginner.
Some prefer to draw the motif directly onto the wooden block and then start with the carving process. Remember that during the painting process, the image will be reversed on the printed surface. When you transfer the image, you could use carbon paper to trace the image on the wooden block.
Once you have traced the image, you can seal the wooden block with a clear acrylic varnish before you begin carving. This is done to close the pores of the wood. This will ensure that there is no ink soaking in during the printing process, which might cause the wood to warp and bend.
Draw Lightly on the Wooden Block
You do not have to trace dark lines on the wooden block when drawing the image you intend to carve out of the wood. Drawing the line lightly instead will give you more room for corrections and modifications.
A darkly drawn line is more rigid, and so there is no room for mistakes. Instead of drawing precisely, start by drawing broad lines with the help of chalk and begin at the bottom of the wooden block so that there are no smudge marks as you work your way up the block.
Finish Carving the Complete Motif
After you have chosen the image and begin carving, see it until the end by carving out the entire motif. During the process, you may need to add finer details and wipe off old chalk marks as you adjust the design. Continue with this process until the carving is ready to proof.
The image should now be clearly visible in the raised part of the wooden block. Even before the actual print, this carved-out motif will give you an idea of how the print will end up looking on the surface.
Align the Painting Surface to the Wooden Block
Before you begin painting with the block, make sure that the surface on which you will paint and the wooden block is well-aligned. This will ensure that the inked block falls in the correct place on the printing surface every time. This process is called ‘registration.’ You can use masking tapes to mark the places where the wooden block needs to be placed each time.
Especially for beginners, it would be helpful to use masking tapes instead of guessing where to place the block. If you add more colors to the block, it becomes even more important to place the wooden colors in the correct position every time. Otherwise, there is a risk of the colors overlapping and creating a mixed and murky outcome.
Apply the Ink With the Help of a Brayer
Before you use the brayer, roll out enough ink and spread it out to be slightly broader than a brayer or roller. Then apply the ink with the help of the brayer onto the wooden block. To err on the side of caution, it is better, to begin with, a little less ink so that you can avoid any smudges that might seep into the recesses of the carved block, causing an unclean image on the painted surface.
If done well, this is the stage where all your hard work comes together, and you can bask in the satisfaction of seeing the image begin to appear from the block onto the surface.
Place the Wooden Block on the Painting Surface
After you have applied color to the wooden block, align it to the painting surface. As you do so, you will leave imprints on the surface, which becomes your first woodcut painting. Be careful not to have excess ink in the wooden block as that may smudge the surface. Also, dragging the wooden block instead of a clean lift will spoil the paint and leave behind ugly smudges.
You can even consider using a baren – a traditional Japanese burnisher used to pressure when using a wooden block for printing – to push down the block and get a uniform print.
Check for Any Further Carving Required on the Basis of Your Proof
As you lift the first wooden block and see the print on the surface, you will also need to assess how to make the motif more finely printed on the surface. For this, you will need to revisit the first proof and make extra cuts to the wooden block to refine your work of art further.
Remember that the image you print is the mirror opposite of the image you have carved out on the wooden block. Therefore, if you need the print to be set in a certain way, be mindful of this fact.
Final Words
Depending on the type of wood you use, the texture will vary in the painting process. The motifs, too, will be largely dependent on how you make the cuts in the wood. If you are a beginner, consider starting with plywood, as it is a softer version of wood that is fairly easy to chisel through and is also pocket-friendly.
Once you have gained more confidence, feel free to experiment with other kinds of wood to see how different qualities of wood affect an equally differing result in terms of texture.
Sources
- The Met Museum: Woodcut
- MoMA: Woodcut
- My Modern Met: How to Make Your Own Woodblock Print Like the Japanese Masters
- Arthistory.net: Woodcut
- Artists and Illustrators: How to make a woodcut
- Minneapolis Institute of Art: Color Woodcuts in the Arts and Crafts Era