
Wood carving, drawing, and printing come together with the fun activity of woodcut prints. It takes some time and perhaps a little skill, but these woodcut prints can be a fun way to create something new and entrancing that no one else has done before. But what are woodcut prints, and how do you get started?
Table of Contents
- 1 Woodcut Prints 101: 4 Essentials to Get Started
- 2 What Are Woodcuts?
- 3 What Are Woodcut Prints?
- 4 How Are Woodcuts Different From Wood Engravings?
- 5 What Tools Do I Need?
- 6 What Are the Best Types of Wood
- 7 How Do I Prepare the Wood?
- 8 Steps to Start Woodcut Printing
- 9 Common Mistakes With Woodcut Printing
- 10 Final Words
- 11 Sources
Woodcut Prints 101: 4 Essentials to Get Started
Woodcut prints combine drawing, wood carving, and printing all in one. To get started, it is essential to pick out the right piece of wood, prepare it, draw the image onto the wood, carve the image out, apply ink, and print the image onto a piece of paper to frame and keep.
Woodcut printing is a lot of fun and can make unique drawings and pictures throughout your whole home. This article will look at what woodcuts and woodcut prints are, how to pick the right type of wood, prepare your wood, the tools you need, some of the steps necessary to create a woodcut print, and common mistakes to avoid when you start. Here it is! Woodcut Prints 101: 4 Essentials to Get Started
What Are Woodcuts?
Woodcuts are one of the oldest methods used for those who have an interest in printmaking. It allows you to get your hands into the work and create some beautiful carvings, even when you have no experience doing this.
To handle woodcuts, you need to take your own design or another drawing and recreate it into a piece of wood. A few types of wood work well here, but a softer option, like beechwood, is best.
The areas on the wood that are not touched will need to be sliced away during the cutting, leaving you with a raised image when done. The artist must then ink the raised image to really help it stand out.
What Are Woodcut Prints?
To take this further, we also have woodcut prints. These will be produced when the artist presses their medium, which is usually a type of carbon paper, onto this inked image. If you plan to use some color in this creation, you may need different wood blocks to handle the colors.
In the beginning, this was an arduous process to work with because it took so much time. The artist would only have enough time to design the woodcut itself and get the drawing directly onto the piece of wood. It would take others to finish this all up, such as specialist craftsmen, to get the wood carving of the design.
Modern methods make it easier to handle woodcut prints on our own now. Artists can work through the whole process and see amazing results too.

How Are Woodcuts Different From Wood Engravings?
Both of these methods are considered relief printing methods. But the woodcuts will be different because you will use a different direction of the grain, and the tools you utilize to complete the project will be different.
When you choose to work in wood engravings, you will need to pick out a hardwood block cut across the grain. Sometimes they will be ingrained, which means they are perpendicular to the tree’s growth thanks to the scorpion tools and the gravers.
On the other hand, woodcuts are made from plywood or plank. This allows the grain to run parallel to the growing direction. This also makes it easier to use chisels, gouges, and knives to finish the work.
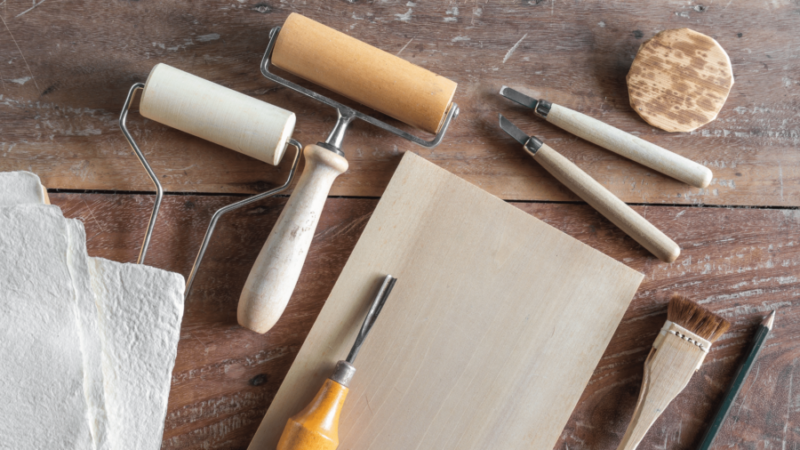
What Tools Do I Need?
It is important to have the right tools to make this process easier. This will ensure that your image transfers well, and you can carve until everything is done. Some of the things that you need include:
Different Carving Knives
To start carving, you will need a few types of knives to help out. It is helpful to have a knife that can get things started, help with the curves, and even one that is good for the finer details of your work.
The V-gouge is a good one to get when you want to carve against the grain on the wood you use. Another option is the U-gouge that works with the grain of the wood.
Never press too hard with the blade, and keep it at a small angle so it won’t break the knives you use. Before you start any carving product, take the time to sharpen your knives so they are ready to go.
Transfer Paper
A high-quality transfer paper is important here as well. You will need this for several methods of taking your chosen image and putting it onto the piece of wood. You can draw from memory, but since not everyone can do this, the transfer paper is a much better option.
It is best to get extra transfer paper. This will help you to be ready and not run out when it is time to make another woodcut print. A good type of carbon transfer paper to consider is the Selizo 100 Sheets Carbon Tracing Paper.
Printing Ink
You will also need to pick out some printing ink. You want to pick out a kind that will be strong enough, so the print turns out well and bright. As a beginner, you can use water-soluble ink because these are fast to use and clean up well.
If you plan to work with more textiles here, you should pick out an ink type that works for fabric. Along with the ink, it is important to keep around a piece of glass. You will use this to spread out any ink before you decide to print. A good ink to consider for woodcut printing includes Speedball Water-Soluble Block Printing Ink.
Brayer
This is an important part because it ensures we can roll out the ink we use onto the wood. Brayers can help get uniform ink on all parts of the block, no matter what kind of picture you want to add.
Show caution when using the Brayer, though. It is a useful tool to work with, but if you overload it with too much ink, it will make any print you do on the wood look murky. A gentle but firm touch is perfect, but don’t put all your strength behind the work. A good brayer to consider is the NICAPA Rubber Brayer Roller.
What Are the Best Types of Wood
Several kinds of wood work well for this kind of printing. Most kids can be adapted to this if they use the right tools and use caution. This makes it easier for you to create the image you want on high-quality wood based on your needs.
However, a few types of wood seem to be popular and work better than others. Softwoods are often preferred because they are easier to carve through and look nice. A few softwoods you can consider include:
- Cedar
- Cypress
- Pine
These are easier to carve, but they may be difficult if your picture has many details. For more detailed options, you may need to consider hardwood. These will need sharper knives and tools and may take more time to carve out the picture. A few good hardwoods to consider include:
- Cherry plywood
- Apple
- Birch
- Ash
- Poplar
- Mahogany
How Do I Prepare the Wood?
It is important to take care of any wood you choose to use. You want to prepare it to make sure everything is even and ready for your work. No piece of wood is naturally perfect without some work, and getting it prepared is one of the best ways to make your print better.
Prime the Wood
When you want to do this on bare wood, you need to seal up all the knots to cause issues with your carving. A shellac-based primer is best for this, though the strong odor is noticeable from far away. They will dry quickly, and you can then move on and stain the wood when ready.
Fill In Holes
This is a useful step because it helps you sand things down smoothly, making it easier to get the exact print you want. This sanding will take care of the cracks and holes. You can choose the exterior or interior grade wood filler when fixing the wood’s imperfections.
When you are ready to sand, going with sandpaper between 150g and 220g is best. This will help make it smooth without being too rough on the wood before you carve. Always go with the grain to prevent any issues with the wood later on.
Steps to Start Woodcut Printing
When the wood is prepared and ready to go, you can start your woodcut printing process. There are several steps to use, but once you pick out or draw the picture you want to use, the steps are as follows:
Transfer the Picture
While some may be able to use their memory and their own creativity to work with this, woodcut prints are popular because it allows you to transfer an image to the wood and use that as the basis as you carve.
There are a few options available for doing this. It depends on whether you have an image in your own head you would like to use or find the perfect design in a picture or online that you can use. Some of your options include:
Direct Drawing
This is considered a simple method of getting the image over to the wood. You draw the image directly on the wood. You can use a marker or a pencil to help outline what you would like to carve.
Be careful for a few points with this one. You want to make sure that you press down hard enough so you can see the mark, but not so hard that you ruin the surface or the grain of your wood. Keep in mind that the image will be reversed when you print it too.
Carbon Paper
With this method, you will lay down some carbon or transfer paper on the wood with your chosen image on top. You can then use a stylus; usually, a pen is fine to trace the drawing into the wood. The pressure needs to be strong enough to move it over to the carbon paper without causing harm to the wood.
You can then use this to get the image onto the piece of wood. You can easily use this outline to create the image on your piece of wood.
Toner Transfer
This is probably the most complicated out of all the methods. But if you want to add as many details to the finished product as possible, then this is the right one for you to choose. You will need to use a few supplies to get started, including mineral spirits, a photocopy, and a tool that can be heated up to do the transferring.
To do this one, make sure that the wood surface is sealed up with varnish, or it won’t work well. This method uses really high heat, so you need to be in some area that will not have flammable objects and has plenty of ventilation.
Start Carving
Once the picture is in place, it is time to work on the carving. Bring out a rubber mat to hold onto the wood. This makes sure that nothing slips and you don’t get harmed. When ready, grab the knives and start carving out the design you want to use.
You will need to use the U-shaped gouges often. This allows you to do any carving necessary that goes along with the grain on your wood. Then you can bring it out again to help carve any small details in the carving.
One thing to remember here is to never cut right into your wood. Doing this will make the carving weaken, and it may break. A shallow angle is best. If you have to force this or feel like you need to go straight down to make any cuts happen, it is time to sharpen the knife you use.
Proof the Block and Picture
This is a bit more in-depth than other steps, but it is important to finish our goals. Once you are satisfied with the carving you did, you should take the time to proof the block. It is hard to know exactly how the print will show up just from the carving.
Set Up the Ink
Luckily this process is pretty easy. You will need a sheet of glass here. Then take any color ink you would like to use (though black is the best) and apply a bit to that glass. Use a putty knife to work the ink a bit because you need it to be smooth and mixed well, lining it out until smooth and easy to work with.
Use the Brayer
Remember that brayer that we talked about before? You can roll it onto the block, moving from all directions. When you do roll the ink onto this, it is important to recharge the brayer again and roll it through some more ink when you are done. Do not push on the block too much; rolling a bit is fine.
Fix Any Issues
As you go through this, you may notice a few parts of the print that are picking up ink where you don’t want them to or in areas that look bad. This is something that you can fix. You will need to go through this and fix it with a bit more carving. Ensure to wash the brayer and glass with some water before the ink dries up to make this work.
Print the Block
Now that we have had some time to get the carving part done and make sure that the ink will look nice on it, we need to do some of the printing parts of this process. You should not proceed through this part until you are certain the image looks exactly how you want.
Cut Some Paper
Take some paper out and slice it to the size you want to use. If you plan to take this and frame it apart, you should think about the frame you would like to use and cut the paper to fit. If you don’t plan to put it into a frame, then the paper can be any size you would like. Cutting a bit of practice paper so you can experiment and try a few things is often best.
Use the Ink
We will go back to some of the steps we did before and work on getting the ink onto the wood and ready to use. You can bring out the glass piece again and layout the ink, running the brayer through it. Then run the prepared brayer over the block like in the previous step.
After the carving is coated with ink the way that you want, move the paper you want to use and put it face down onto the block. Regular paper will work with any side you use, but if you use special paper, consider this when laying the paper out.
Put the Image on the Paper
Once the paper is centered well, you can start imprinting your image. You can start from the center of the paper. Press down lightly to make an impression without forcing things. Using a rice spoon or another object is often best for this. Try to keep the paper from sliding anywhere here.
Another option to use is a baren. This is an added tool that helps you to get pressure evenly across the whole paper at the same time. It sometimes gives a better look than other options, but a flat and smooth surface will work if you don’t wish to spend extra.
You will need to do two rounds of this. The first time will be soft to help get the paper to stay still and get a small outline of the image onto the paper. The second one will be firmer. Please don’t force it or cause it to break or tear. But you do want more pressure to get the ink on the paper.
Lift the Paper
After you have had time to get the paper soaked with the ink, it is time to remove it and see how things work. You can lift the paper from the block, but do it slowly not to cause any rips or tears.
Set the paper aside for a bit to dry. This should be set for a few hours. You can choose whether you would like to clean off the woodblock with a bit of water and scrub the ink off, but it is fine if you leave the ink there. You can then frame the print and enjoy all your handiwork.
Common Mistakes With Woodcut Printing
As a beginner to woodcut printing, there are many steps and things to consider. Even the process of taking the image and adding it to the piece of wood has several options, and that is after you choose what type of wood to use and what image should make its way onto the wood.
It is easy to make some simple mistakes when you get started on woodcut printing. Knowing the most common mistakes and how to avoid them will make life a little easier. Some common mistakes to avoid when you first start woodcut printing include:
Not Using the Right Tools
Always pick the right tools for the job. This will make the process of wood carving so much easier. We talked about a few of the tools that help with this, and you can add in some more based on what you wish to create and how much you are willing to spend.
Another thing to remember is always to keep the tools sharp. Wood is hard to maneuver and work with, even the softwoods. You need to sharpen the wood after each use to make sure it can create everything you want with ease.
Picking a Drawing That Is Too Complicated
Save the complicated things for later. There are many great designs you can choose for your work. And you may even draw a few yourself. But if this is the first time you have done this type of printing, keep it simple. Carving out something with many details is much different than drawing it. You don’t want to get yourself in too deep with this either.
For the first few projects, keep the design simple. Your goal is to learn and explore to see what works and what doesn’t. After you gain confidence and understand how all this works, you can start to add more detail.
Working with wood is hard. The carving, even with a sharp knife, is not always as simple as it seems. You need to build up the skills to translate some of your goals in drawing over to a wood carving.
Not Testing Out the Woodcut First
When we talked about using the woodcut before printing it onto a piece of paper, we talked about testing the woodcut and seeing if it was ready to go. Sometimes an image looks good, but until we add the ink onto it, we may not catch some of the small imperfections that will ruin the whole thing.
Always do a test run with the woodcut. After you feel satisfied with the design, please take a moment to add ink to it, using the method we discussed above. You will likely see a few imperfections to clean up. Just put water on the wood and clean it off and take the time to fix the mistake. It is better to catch it now instead of catching it after you try to do your print.
Pressing Too Hard at Any Point
We discussed a few times in this article why it is important never to press too hard or force something. Any time you do this, it can result in the woodcut not performing the way you want.
If you press too hard when you carve, it could result in the wood breaking or starting to fall apart. The wrong kind of knife pressure is one of the worst things you can do for your carving. Firm but gentle pressure with a slight angle is best.
The right pressure when adding the print to your paper is important too. Pushing down too hard, especially the first time, may smear the ink and ruin the effect. You can easily rectify this with another paper, but it’s still a pain to handle. If you are interested in more details on the essentials for a beginner, you might want to read our article on The Essential Woodcut Painting Intro for Beginners.
Final Words
Woodcut printing is a fun activity that brings together different forms of art. From preparing the piece of wood you want to use, drawing the picture or design you need to use, carving up the wood, and preparing the ink, you can get experience with many different art mediums. Create something unique when you start working with woodcut printing.
Sources
- Visual Arts: Woodcuts: Type of Printmaking
- Wisegeek: What is Plywood?
- Letterpress Commons: Woodcut
- Amazon: Selizo 100 Sheets Carbon Transfer Paper
- Amazon: Speedball Water-Soluble Block Printing Ink Starter Set
- Amazon: NICAPA Rubber Brayer and Roller
- My Modern Met: How to make Your Own Woodblock print Like the Japanese Masters
- Diode Press: Woodcut Printmaking Series: Tools and Materials
- Paint People: Preparing Bare Wood for Painting or Staining